PREREQUISITE
First, ensure you have the Ubuntu 22.04 LTS server installed on the Raspberry PI 4B (2GB, 4GB, or 8GB RAM. The higher the better).
Also, if you did a headless installation, you should be able to communicate with the Pi via SSH.
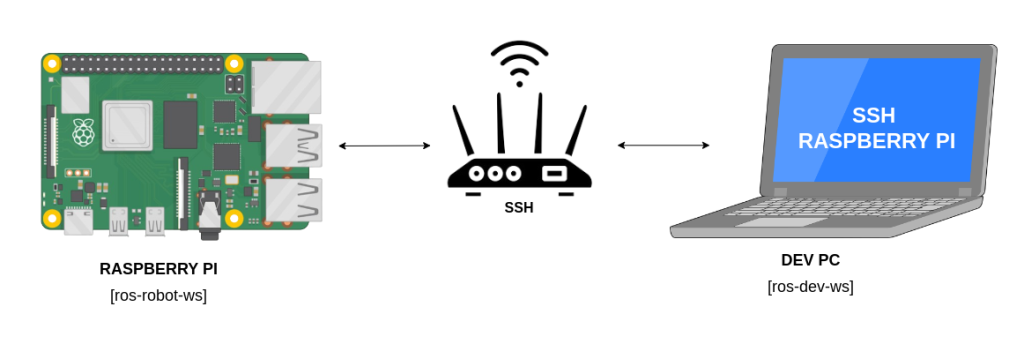
All we’ll be doing next assumes you can now communicate with your Raspberry Pi 4B running Ubuntu 22.04 LTS server with SSH (via wireless or wired communication).

INSTALLING ROS HUMBLE BASE (not Desktop)
Follow the instructions (step by step) to install ros-humble-ros-base (not ros-humble-desktop) on the Pi. here’s a link to the documentation.
The basic steps (following the documentation link) to install ros-humble-ros-base on the Pi are:
- Set locale
locale  # check for UTF-8

sudo apt update && sudo apt install locales

sudo locale-gen en_US en_US.UTF-8

sudo update-locale LC_ALL=en_US.UTF-8 LANG=en_US.UTF-8

export LANG=en_US.UTF-8

locale # verify settings- Setup Sources
sudo apt install software-properties-common

sudo add-apt-repository universe


sudo apt update && sudo apt install curl -y

sudo curl -sSL https://raw.githubusercontent.com/ros/rosdistro/master/ros.key -o /usr/share/keyrings/ros-archive-keyring.gpg


echo "deb [arch=$(dpkg --print-architecture) signed-by=/usr/share/keyrings/ros-archive-keyring.gpg] http://packages.ros.org/ros2/ubuntu $(. /etc/os-release && echo $UBUNTU_CODENAME) main" | sudo tee /etc/apt/sources.list.d/ros2.list > /dev/null- Install ros2 package (ros-humble-ros-base)
sudo apt update

sudo apt upgrade

sudo apt install ros-humble-ros-base- Next, add the following command to the .bashrc file to enable automatic sourcing of the ros humble environment and installed packages whenever you open a new terminal.
echo "source /opt/ros/humble/setup.bash" >> ~/.bashrcAfter these, you can go to the next step below.
INSTALLING AND SETTING UP COLCON FOR BUILDING ROS2 PACKAGES
Colcon is required to build ros2 packages created in your ros workspace.
- Install colcon
sudo apt install python3-colcon-common-extensions- Setup colcon_cd
echo "source /usr/share/colcon_cd/function/colcon_cd.sh" >> ~/.bashrc

echo "export _colcon_cd_root=/opt/ros/humble/" >> ~/.bashrc- Setup colcon tab completion
echo "source /usr/share/colcon_argcomplete/hook/colcon-argcomplete.bash" >> ~/.bashrcWith all the above added to the .bashrc file, the colcon environment and functions will be automatically activated whenever you open a new terminal as well as automatic sourcing of the ros2 humble environment.
To learn more about colcon, checkout the documentation.
You can check if ros2 humble and colcon source command have been successfully added to the .bashrc file by running the following in the terminal:
sudo nano ~/.bashrcyou should see the following highlighted texts (in the image below) at the bottom of your .bashrc file:

INSTALLING ROSDEP
Rosdep is a dependency management utility that can work with packages and external libraries. It is a command-line utility for identifying and installing dependencies to build or install a package.
It is most often invoked before building a workspace, where it is used to install the dependencies of the packages within that workspace.
[Ref: Documentation link]
Follow the instructions below to install rosdep:
sudo apt-get update

sudo apt install python3-rosdep2

sudo rosdep init #NOTE:this might give an error, do not worry, just continue

rosdep update
INSTALL SETUPTOOLS FOR BUILDING ROS2 PYTHON PACKAGES
sudo apt install python3-pip

pip3 install setuptools==58.2.0
CREATING A ROS2 WORKSPACE

- In the root folder of your Pi (i.e the home directory)
- Create a ros workspace folder. I would be using the name in the picture above – ros-robot-ws
mkdir -p ~/ros-robot-ws/src- change the directory into the root ros workspace folder
cd ~/ros-robot-ws- Build the workspace initially with colcon (while still in the root workspace folder)
colcon buildYou should now see three other folders – build, install, and log – apart from the src folder already created earlier.
- Let’s setup automatic sourcing for the created ros workspace (ros-robot-ws) in the .bashrc file so that it is automatically sourced whenever you open a new terminal. Run in terminal:
echo "source ~/ros-robot-ws/install/setup.bash" >> ~/.bashrcTEST WITH HELLOWORLD PACKAGE
- Open a new terminal (to auto-source your ros2 environment and workspace) and go to your ros workspace folder:
cd ~/ros-robot-ws- Change the directory into the src folder:
cd /src- Clone my HelloWorld ROS2 cpp and py packages:
git clone https://github.com/samuko-things/helloworld_ros2.git- Change the directory to the root workspace folder:
cd ../- Optionally, run rosdep to install any necessary dependencies (specified in their package.xml file):
rosdep install -i --from-path src --rosdistro humble -y- Build the packages with colcon:
colcon build --packages-select helloworld_cpp

colcon build --packages-select helloworld_py --symlink-install- Open two separate terminals. In one of the terminals, run:
ros2 run helloworld_cpp talker- In the other run:
ros2 run helloworld_py listenerROS2 COMMUNICATION BETWEEN PI AND DEV PC
- On your dev PC to which the Raspberry Pi is connected (which also has ros2 humble installed and ros workspace setup).
Clone and build the helloworld package as you did on the Pi above.
- Source your workspace (if no automatic sourcing was setup).
- Run on a terminal on the dev PC:
ros2 run helloworld_py talker- Run on a new terminal on the Raspberry Pi (to auto-source your ros2 environment and workspace) :
ros2 run helloworld_cpp listener